
Load Balancing Algorithms Clearly Explained (In Under 8 Minutes)
How Different Algorithms Actually Behave in Production, and How to Choose the Right One


Accelerate Agents to Production With Amazon Bedrock AgentCore
Presented by AWS
Accelerate agents to production with composable services that work with any framework, any model. AgentCore is an agentic platform for building and running production-grade AI agents, securely at scale, with no infrastructure to manage. Now with complete control over agent actions through policies, and continuous evaluations of real-world agent behavior to boost quality.
Load Balancing Algorithms Clearly Explained
Load balancing is not about spreading traffic evenly. It’s about spreading work safely.
Those only mean the same thing when requests cost about the same and servers behave about the same; which is almost never true in production.
Once you add long-lived connections, uneven instance sizes, caches, or sticky sessions, an “even” distribution can still overload a single backend.
The algorithm you choose quietly decides whether your system stays smooth or starts to buckle.
What a Load Balancer Actually Optimizes
Every algorithm answers one question: “Which backend is best according to this metric?”
But the signal it picks isn’t always the one you assume.
Algorithms typically optimize for things like:
Request count → “Spread requests evenly across all servers”
Concurrency → “Send new requests to the server handling the least work right now”
Latency → “Choose the server that’s responding the fastest”
Locality → “Keep a user on the same server for state or cache reasons”
Stability → “Reduce how much traffic moves around when servers scale up or down”
This is where misunderstandings start. “Even traffic” doesn’t mean “even load”.
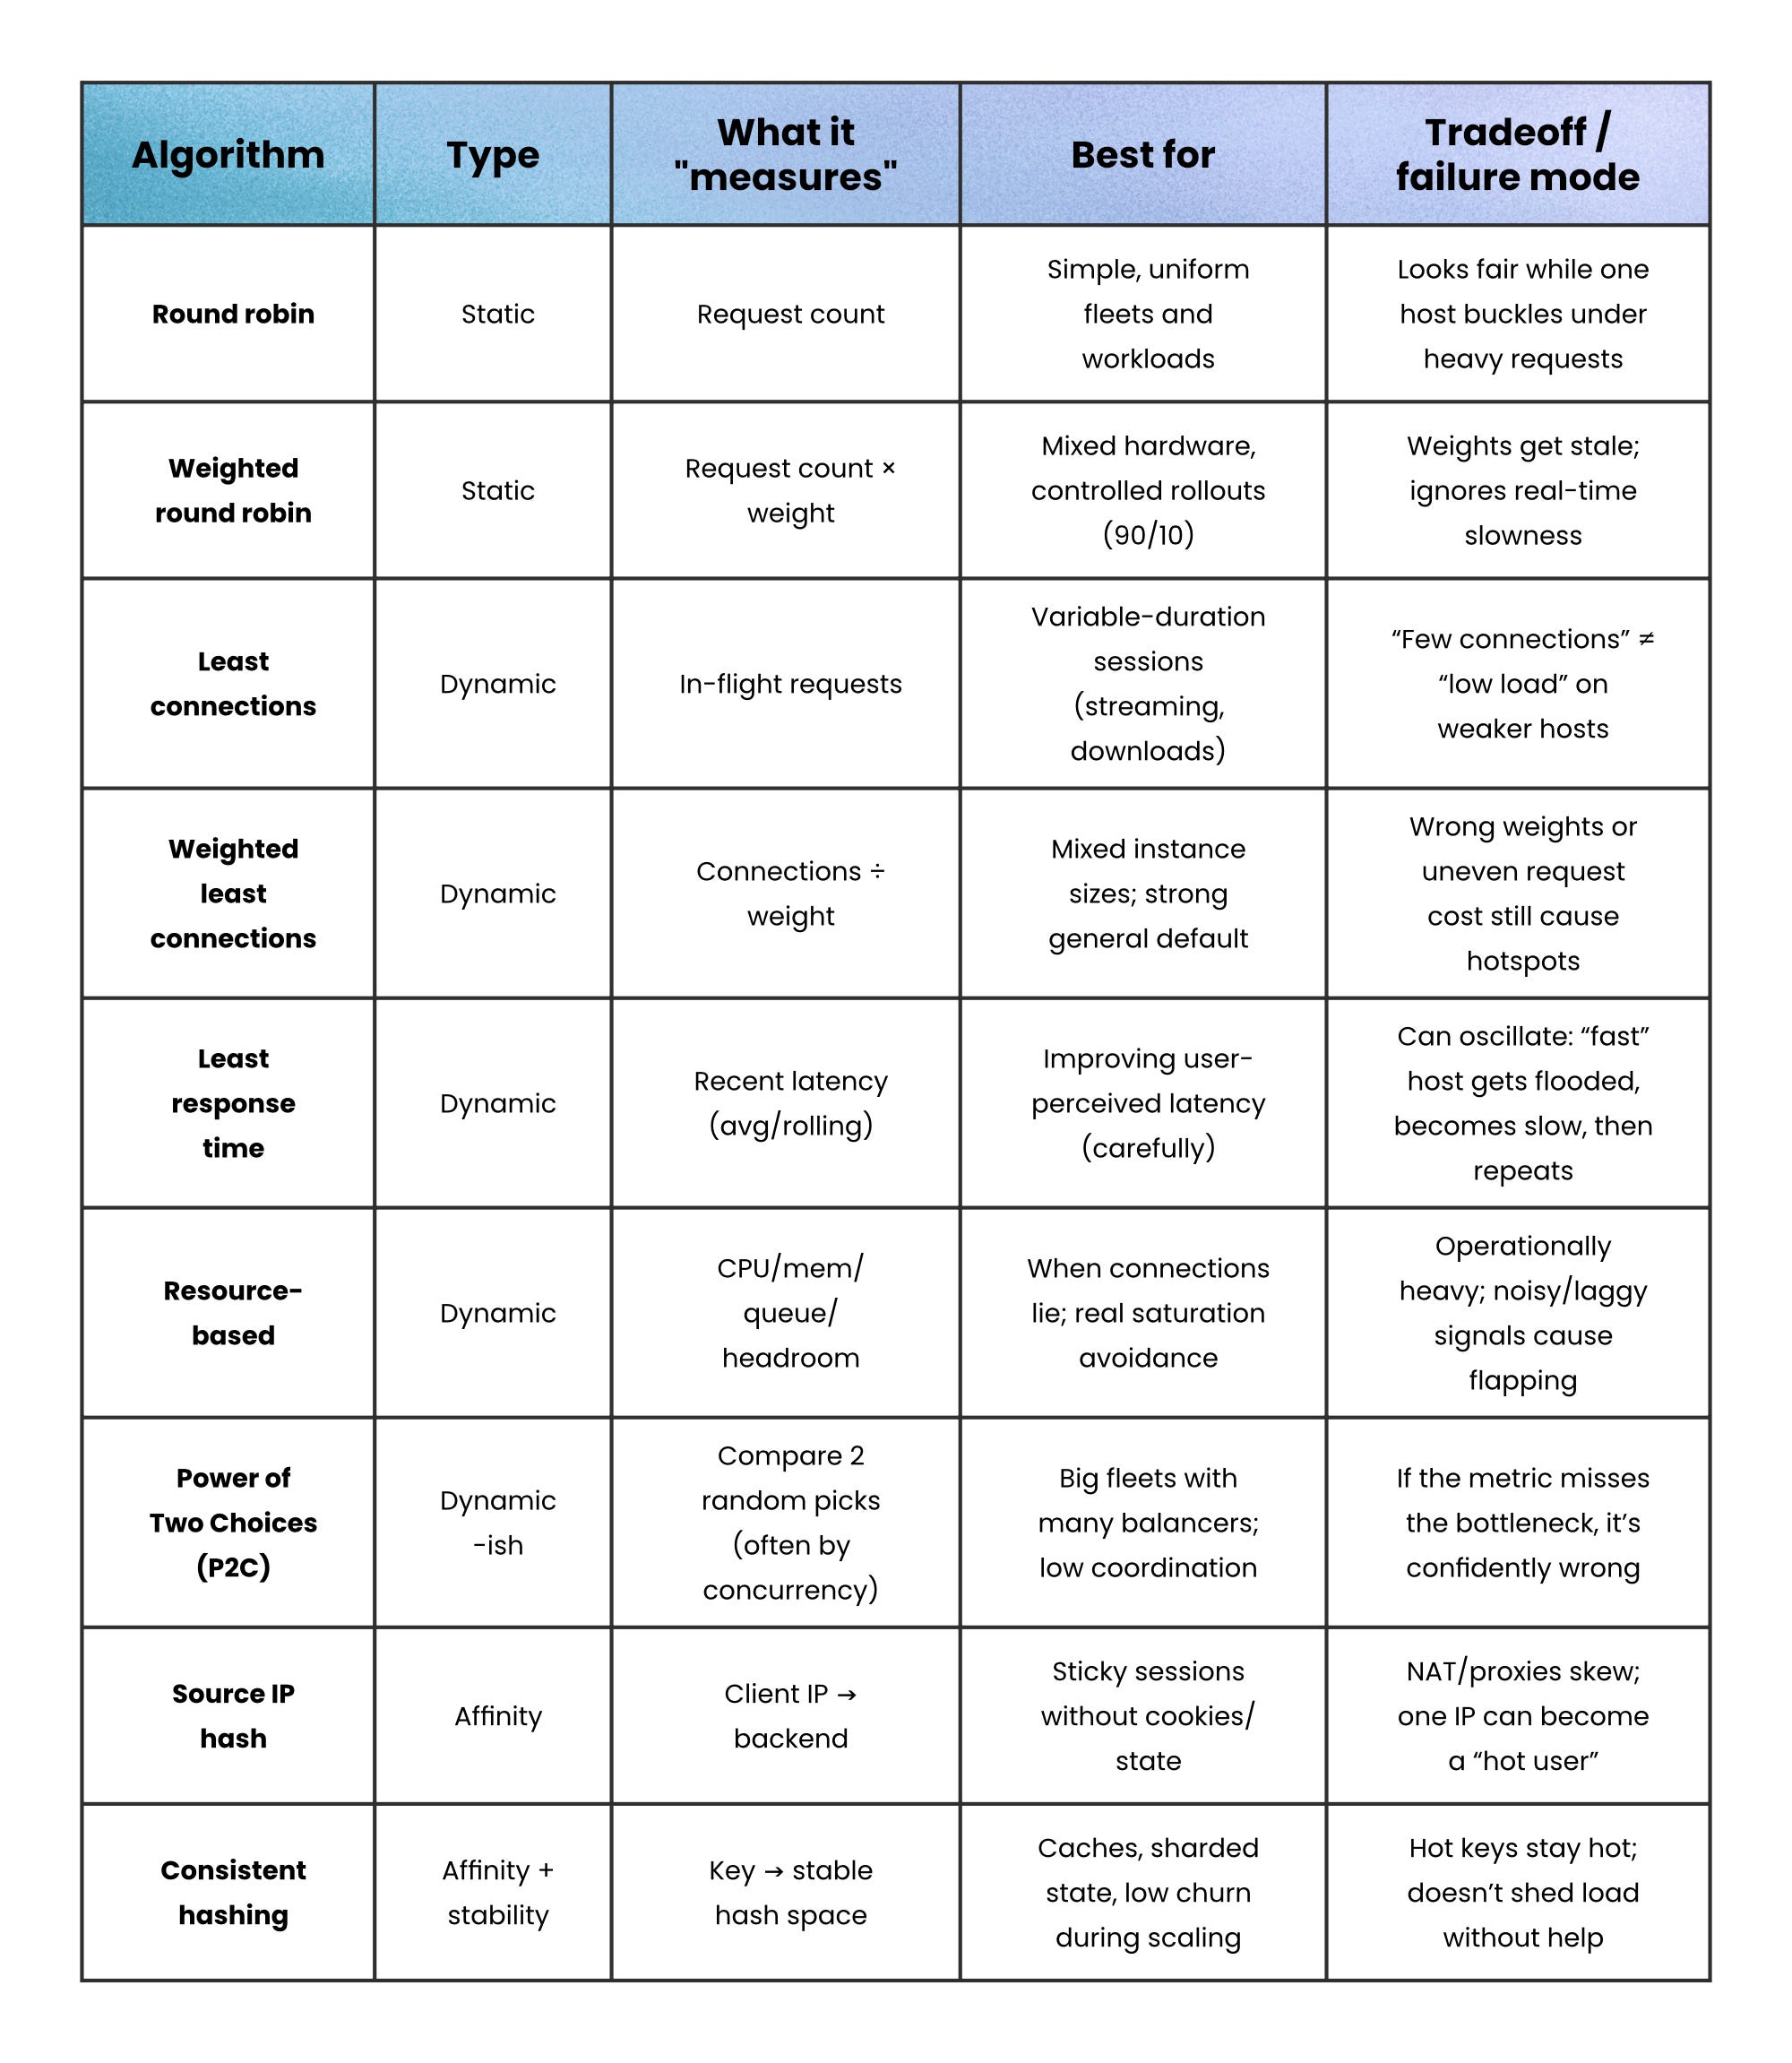
Static vs Dynamic Algorithms
Most algorithms fall into two buckets:
Static algorithms → Use a fixed pattern (like rotation or weights) and ignore live load.
Dynamic algorithms → Adapt based on runtime signals (like active connections or response time).
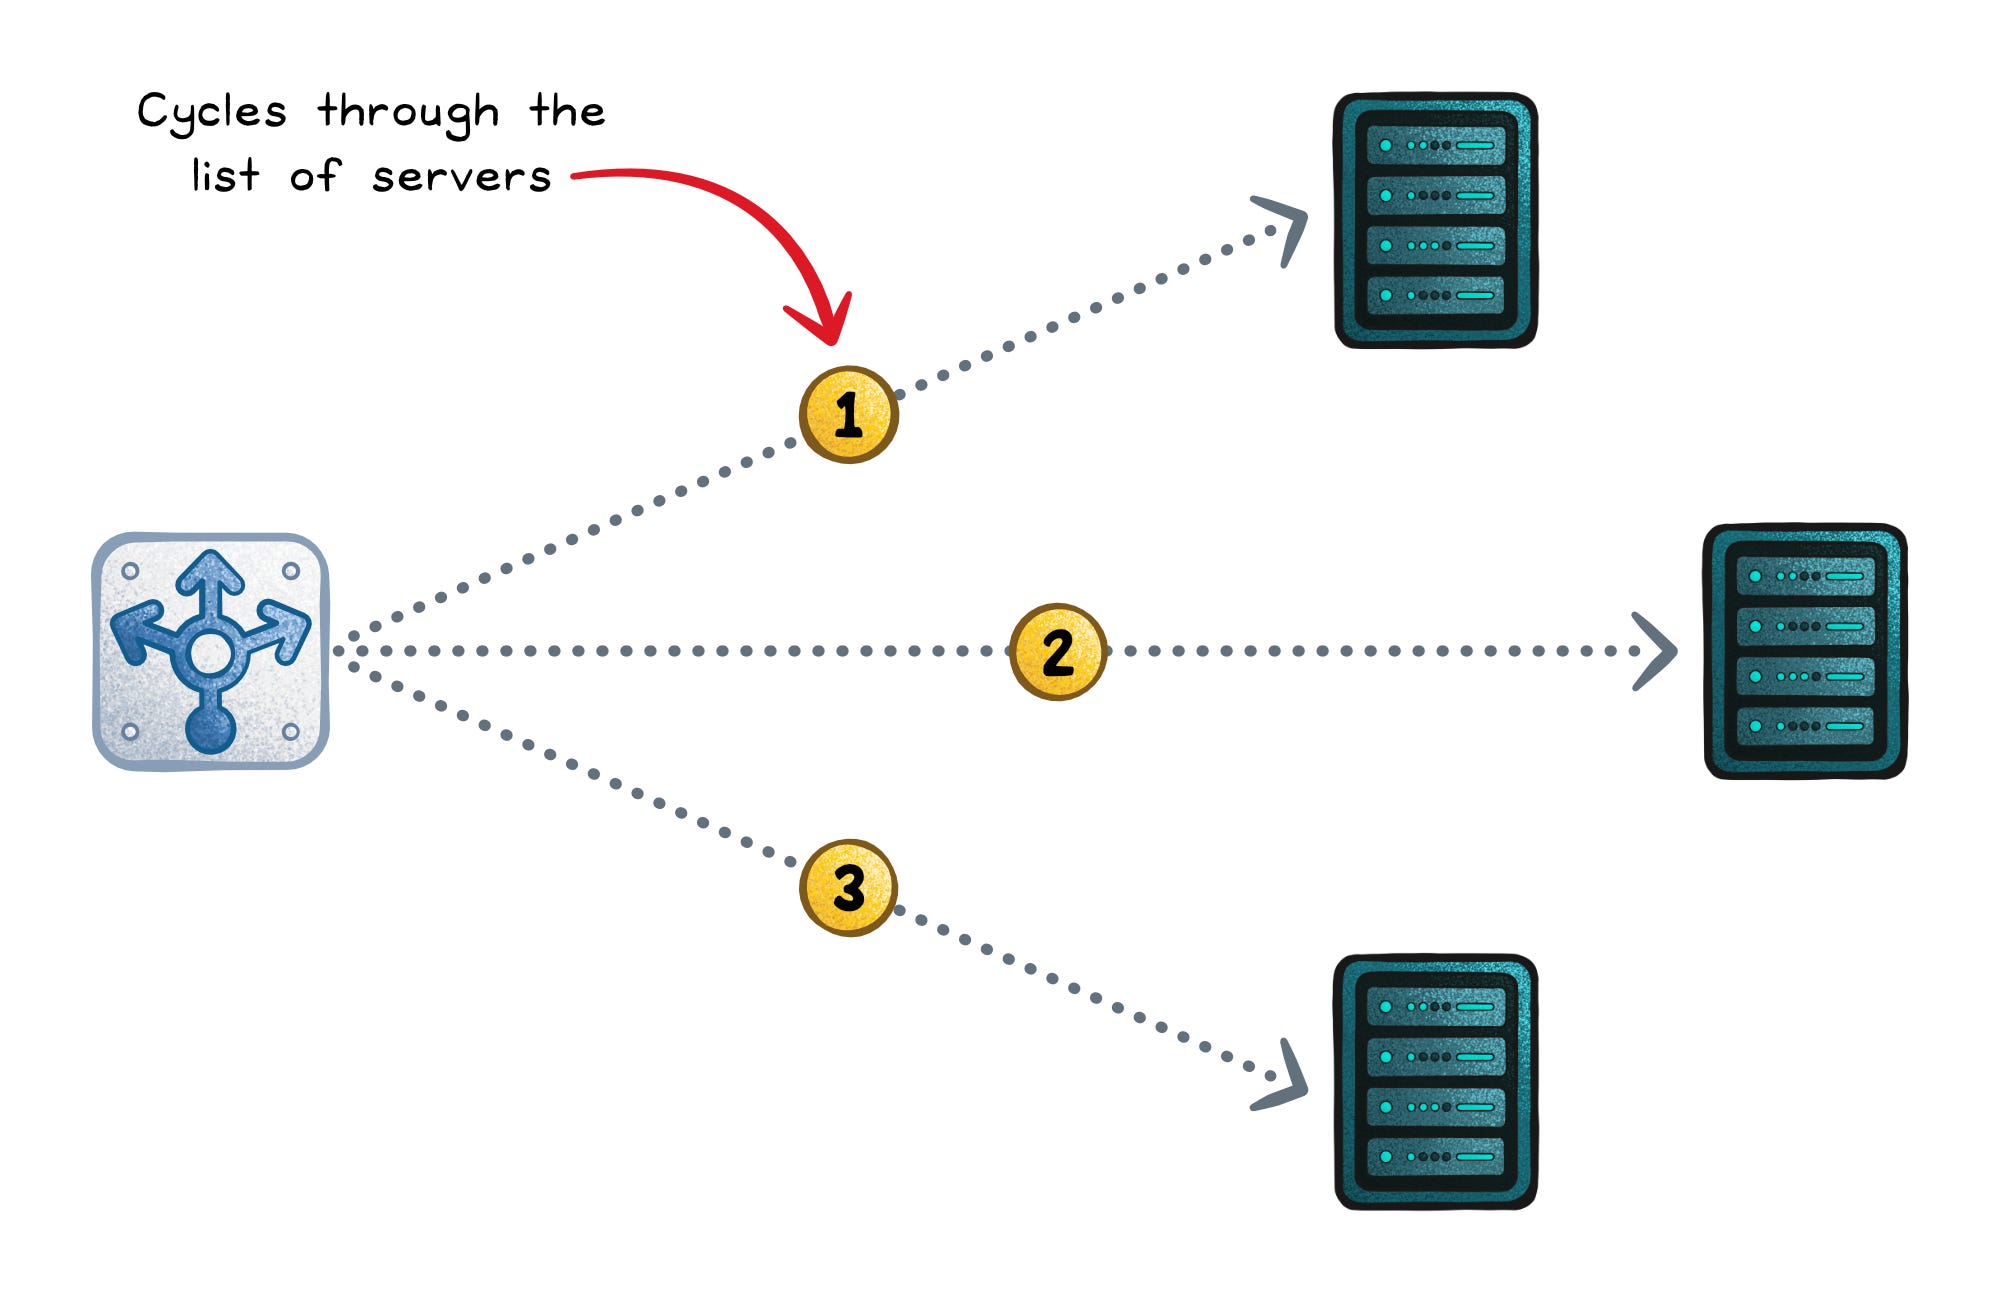
Round robin (static)
Round robin walks the server list in order, handing out requests one by one.
It’s “fair by count” when servers are similar and requests cost about the same.
When that assumption breaks, it still deals the cards evenly; even if one player keeps getting all the high cards.
Optimizes for → Even request count
Works when → Requests have similar cost and servers are similar
Fails when → Some requests are much heavier than others
Failure signs → One server overloads even though distribution looks “fair”
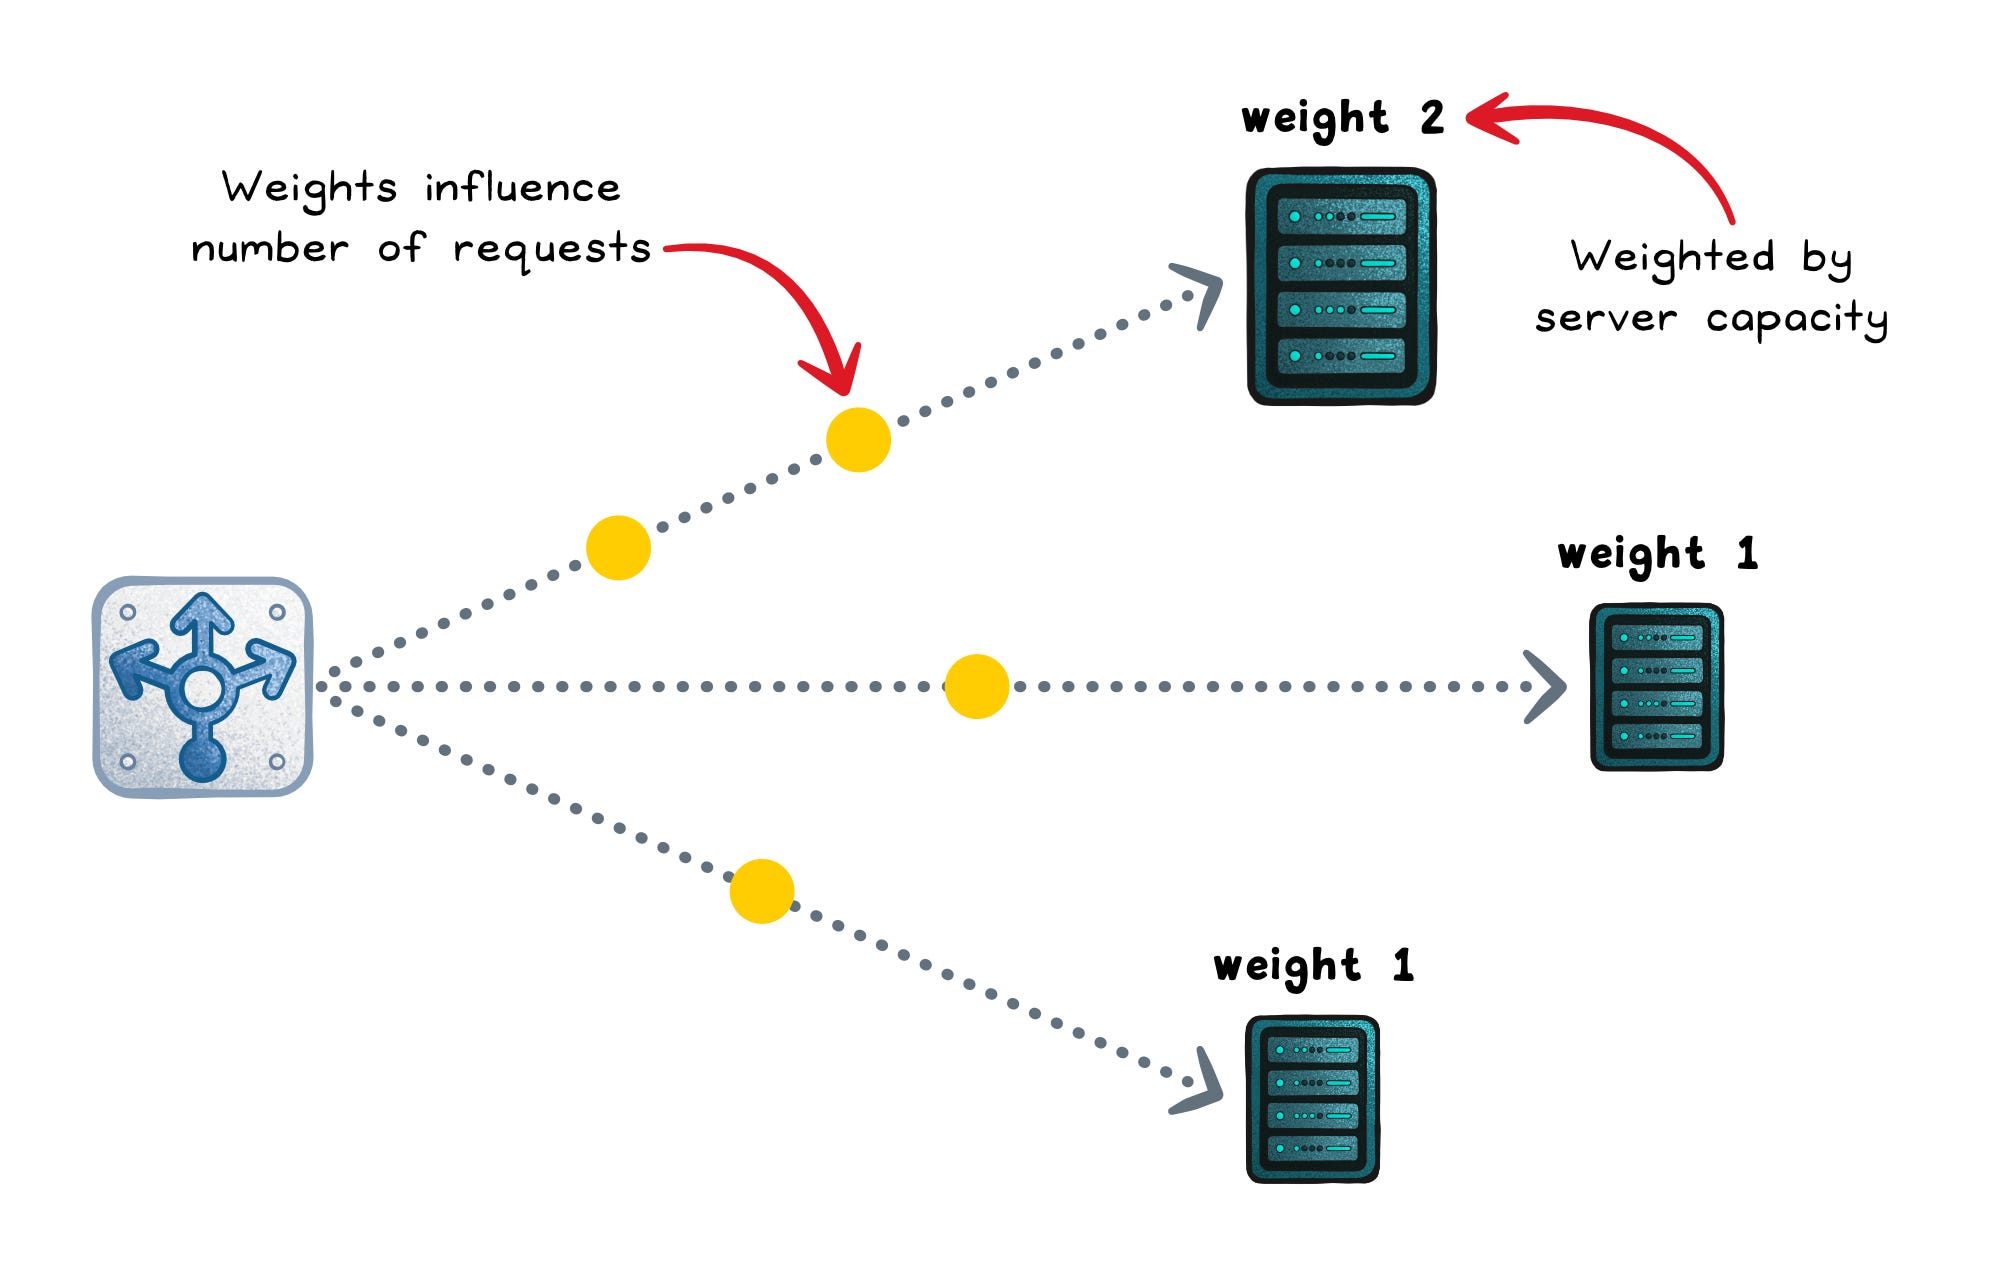
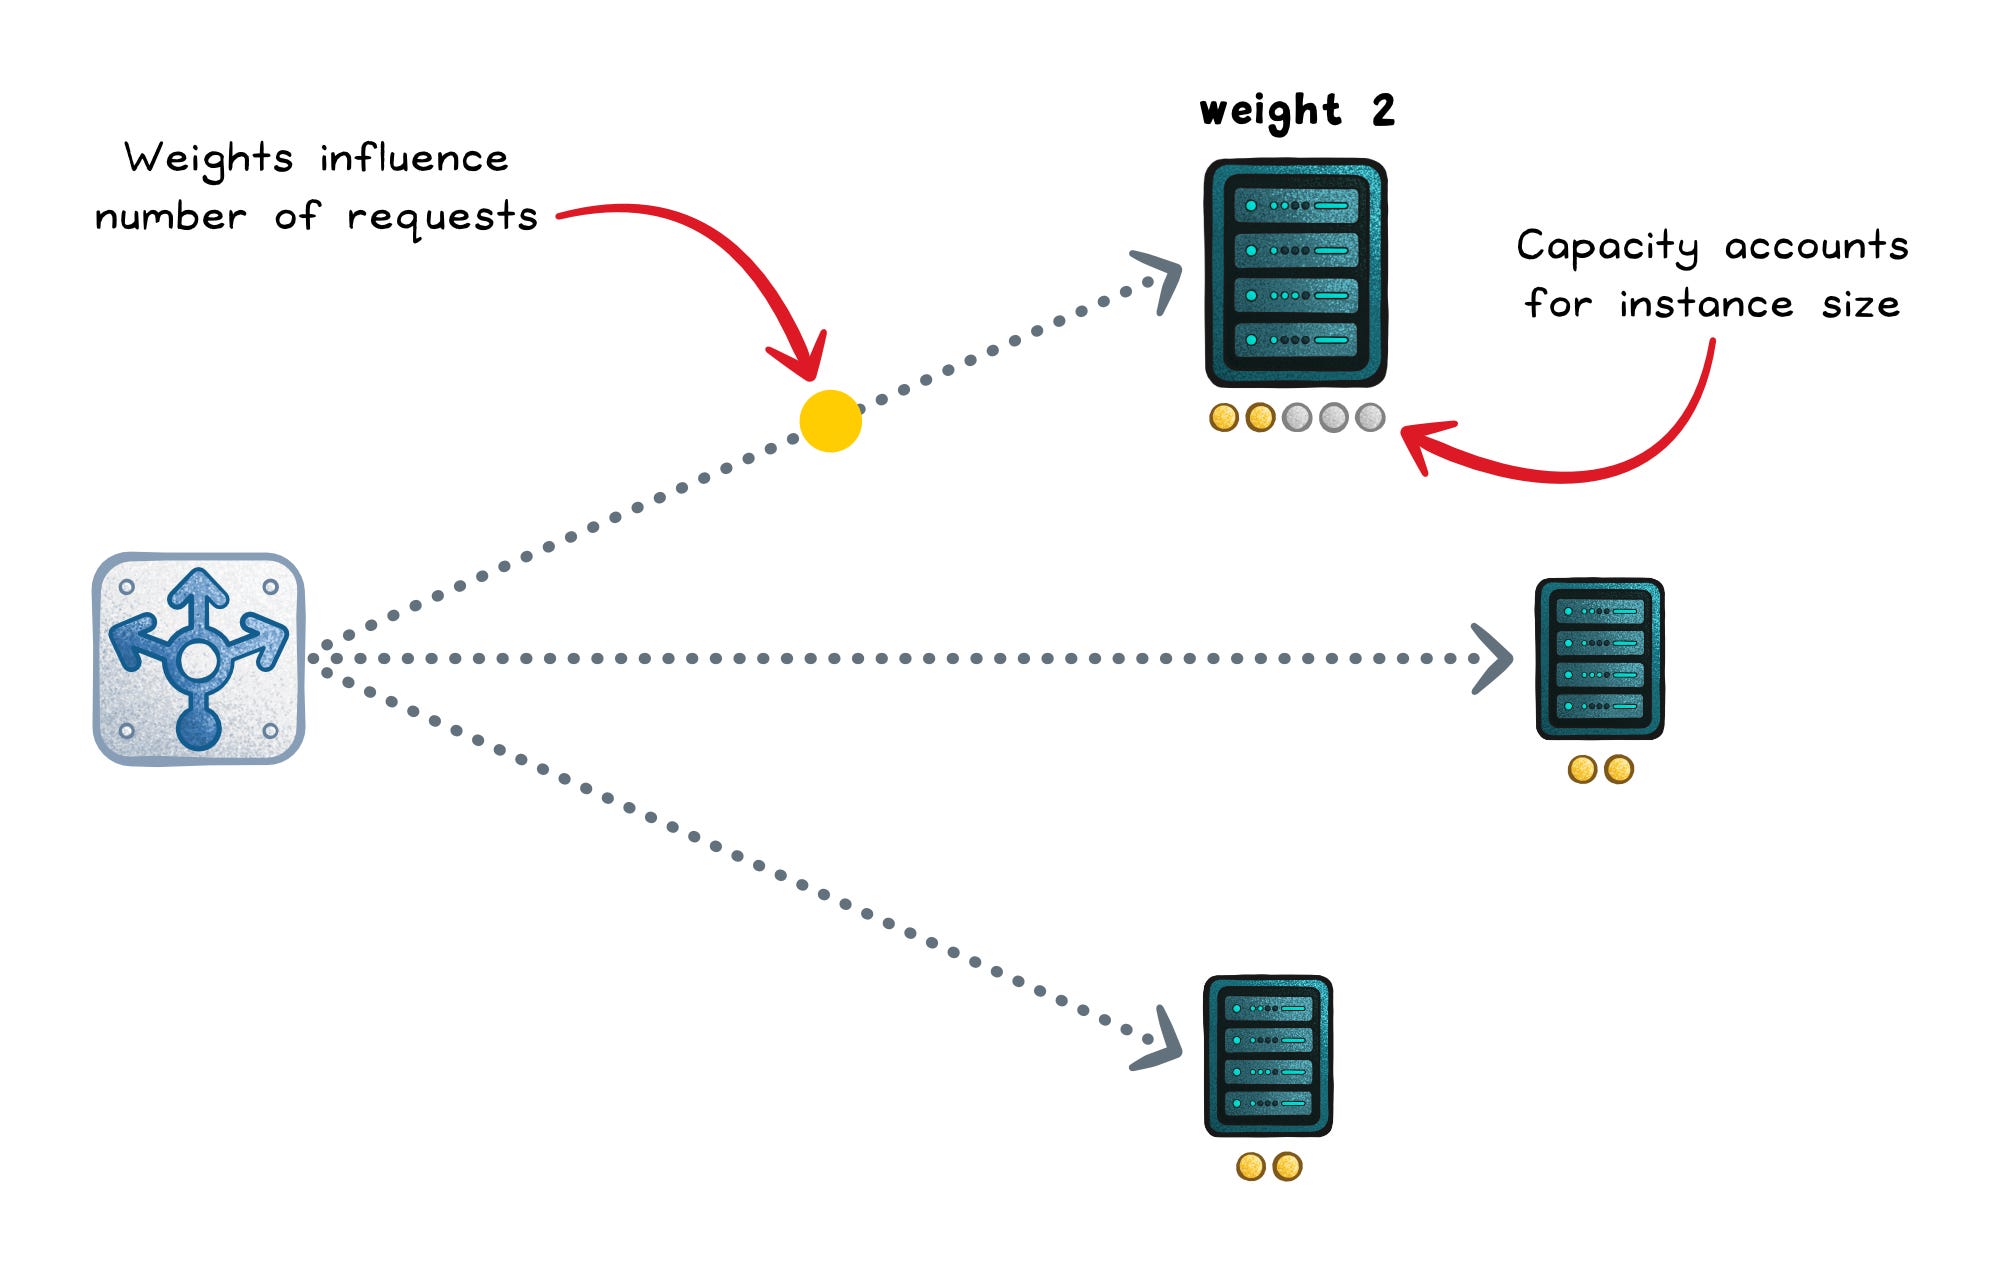
Weighted round robin (static)
Weighted round robin keeps the same predictable cycle, but higher-weight servers show up more often (weight = a configured capacity hint).
This works well for mixed hardware or controlled rollouts (like a 90/10 canary), but it still ignores real-time slowness.
Optimizes for → Even request count scaled by weights
Works when → Weights reflect real capacity and stay up to date
Fails when → Capacity changes but weights don’t
Failure signs → Overloaded “high-weight” nodes or skewed rollout splits
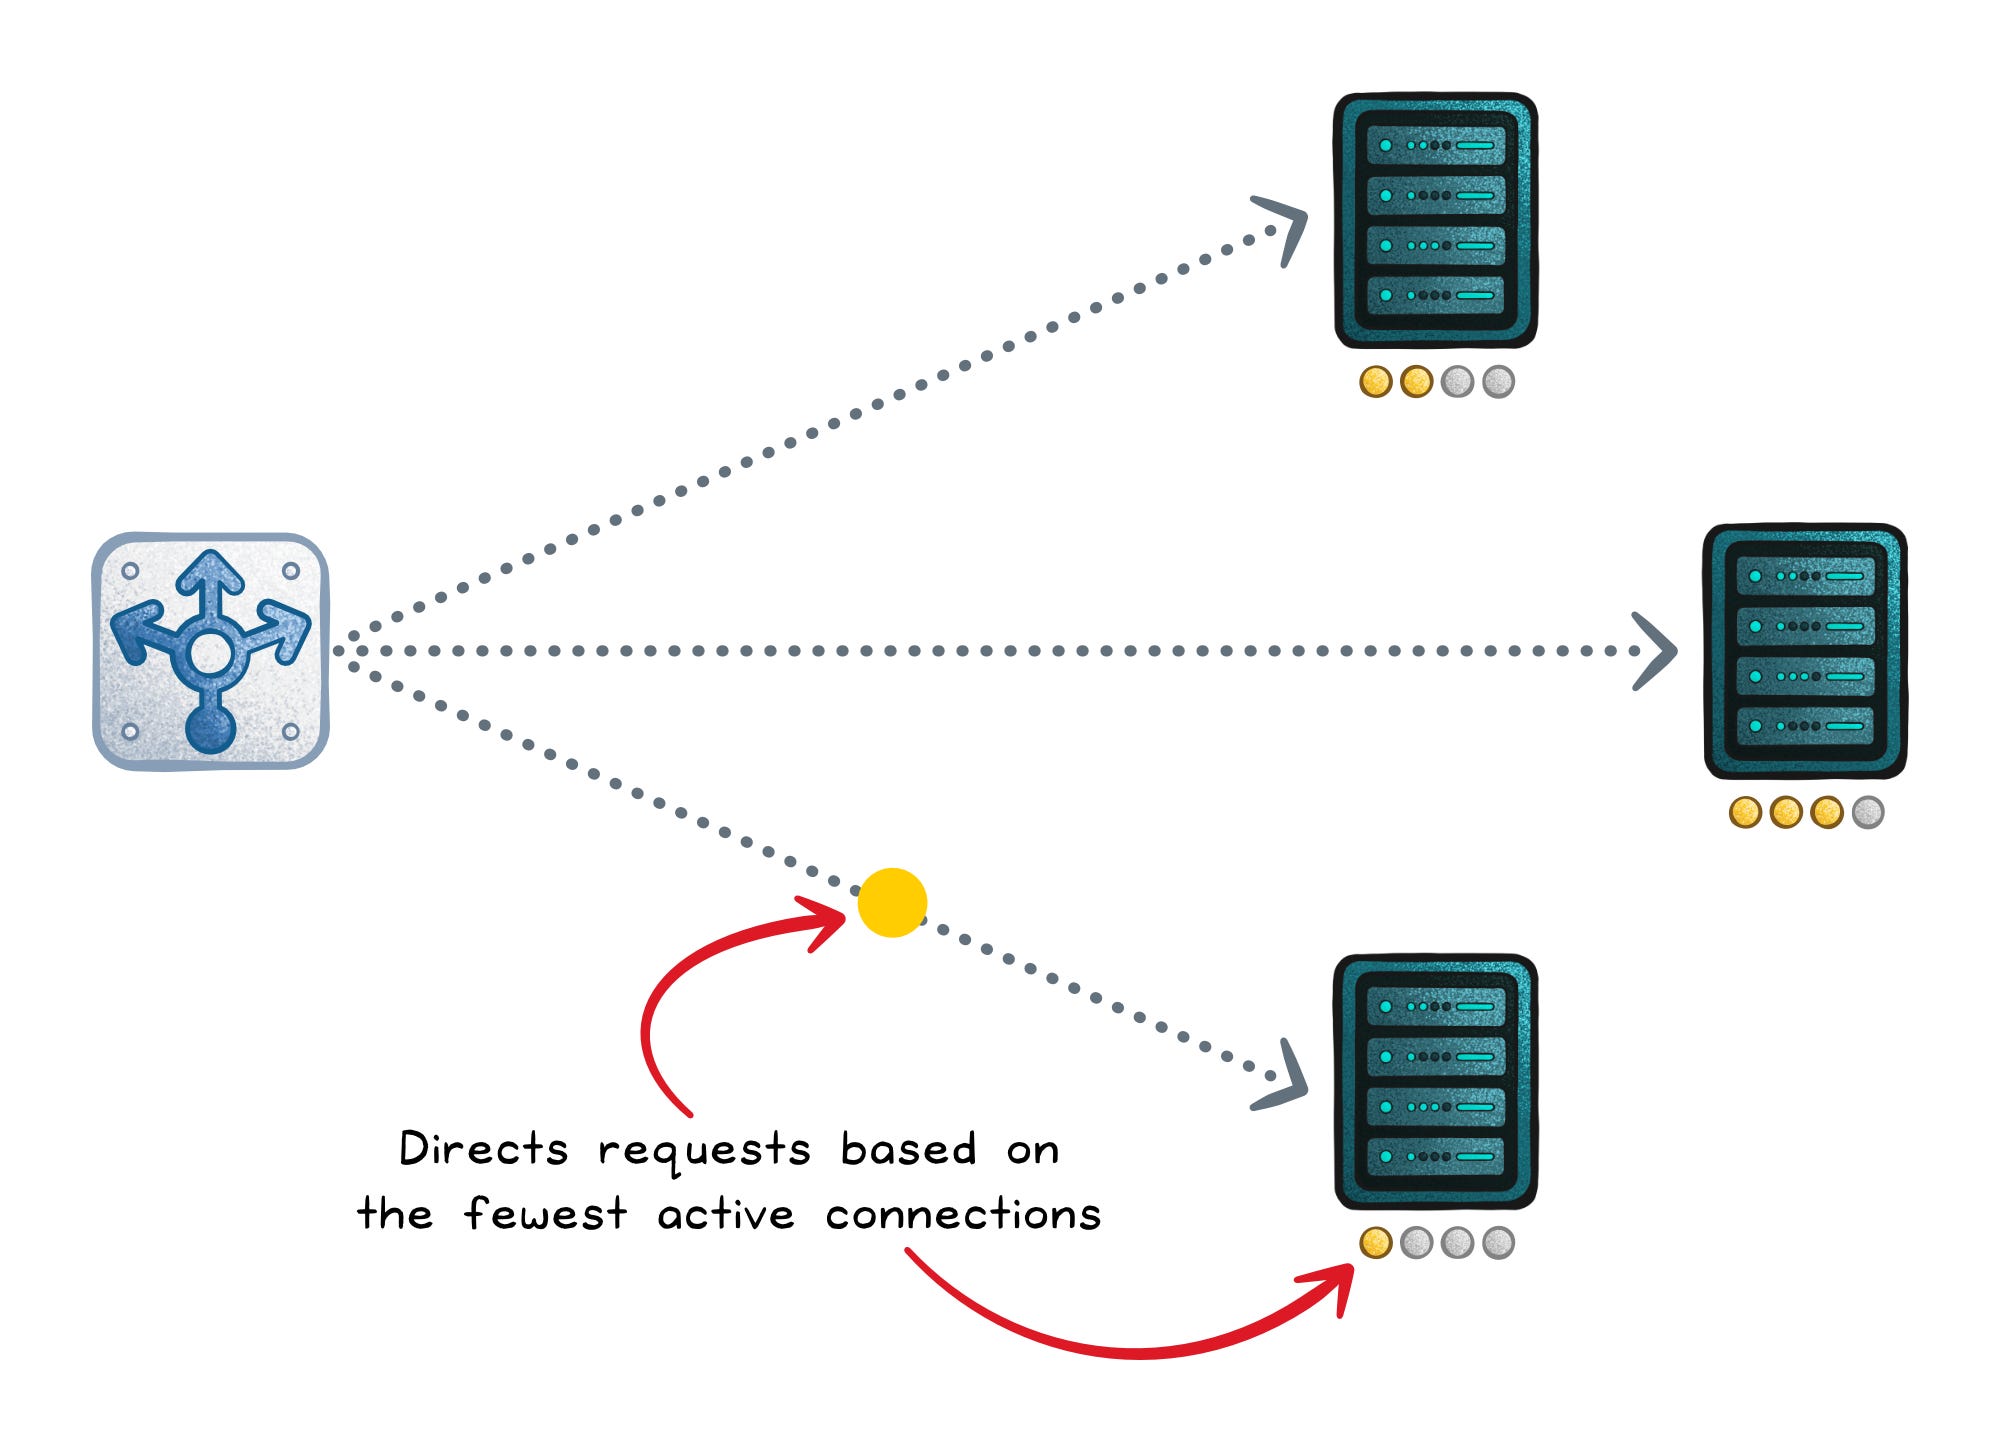
Least connections (dynamic)
Least connections sends new work to the server with the fewest active connections (in-flight requests).
It shines when sessions vary in length (downloads, WebSockets, streaming), because a server stuck on long sessions stops attracting more.
It can still misbehave with uneven hardware, because “5 connections” can mean “fine” on one host and “dying” on another.
Optimizes for → Lowest active concurrency
Works when → Connection count correlates with work
Fails when → Long-lived sessions pin concurrency on one backend
Failure signs → WebSockets/streaming endpoints cause uneven load
Weighted least connections (dynamic)
Weighted least connections scales “how loaded” a server looks by its capacity (roughly: connections ÷ weight).
You keep the benefits of load awareness, while acknowledging that bigger servers should carry more concurrent work.
It’s a strong default when you have mixed instance sizes.
Optimizes for → Spreading concurrent load proportional to capacity (connections ÷ weight).
Works when → Weights match real capacity and connections roughly track load
Fails when → Requests vary wildly, weights are wrong, or the bottleneck isn’t connections (CPU/DB/latency).
Failure signs → Hot instances, rising tail latency, and distribution shifts a lot when you tweak weights/scaling.
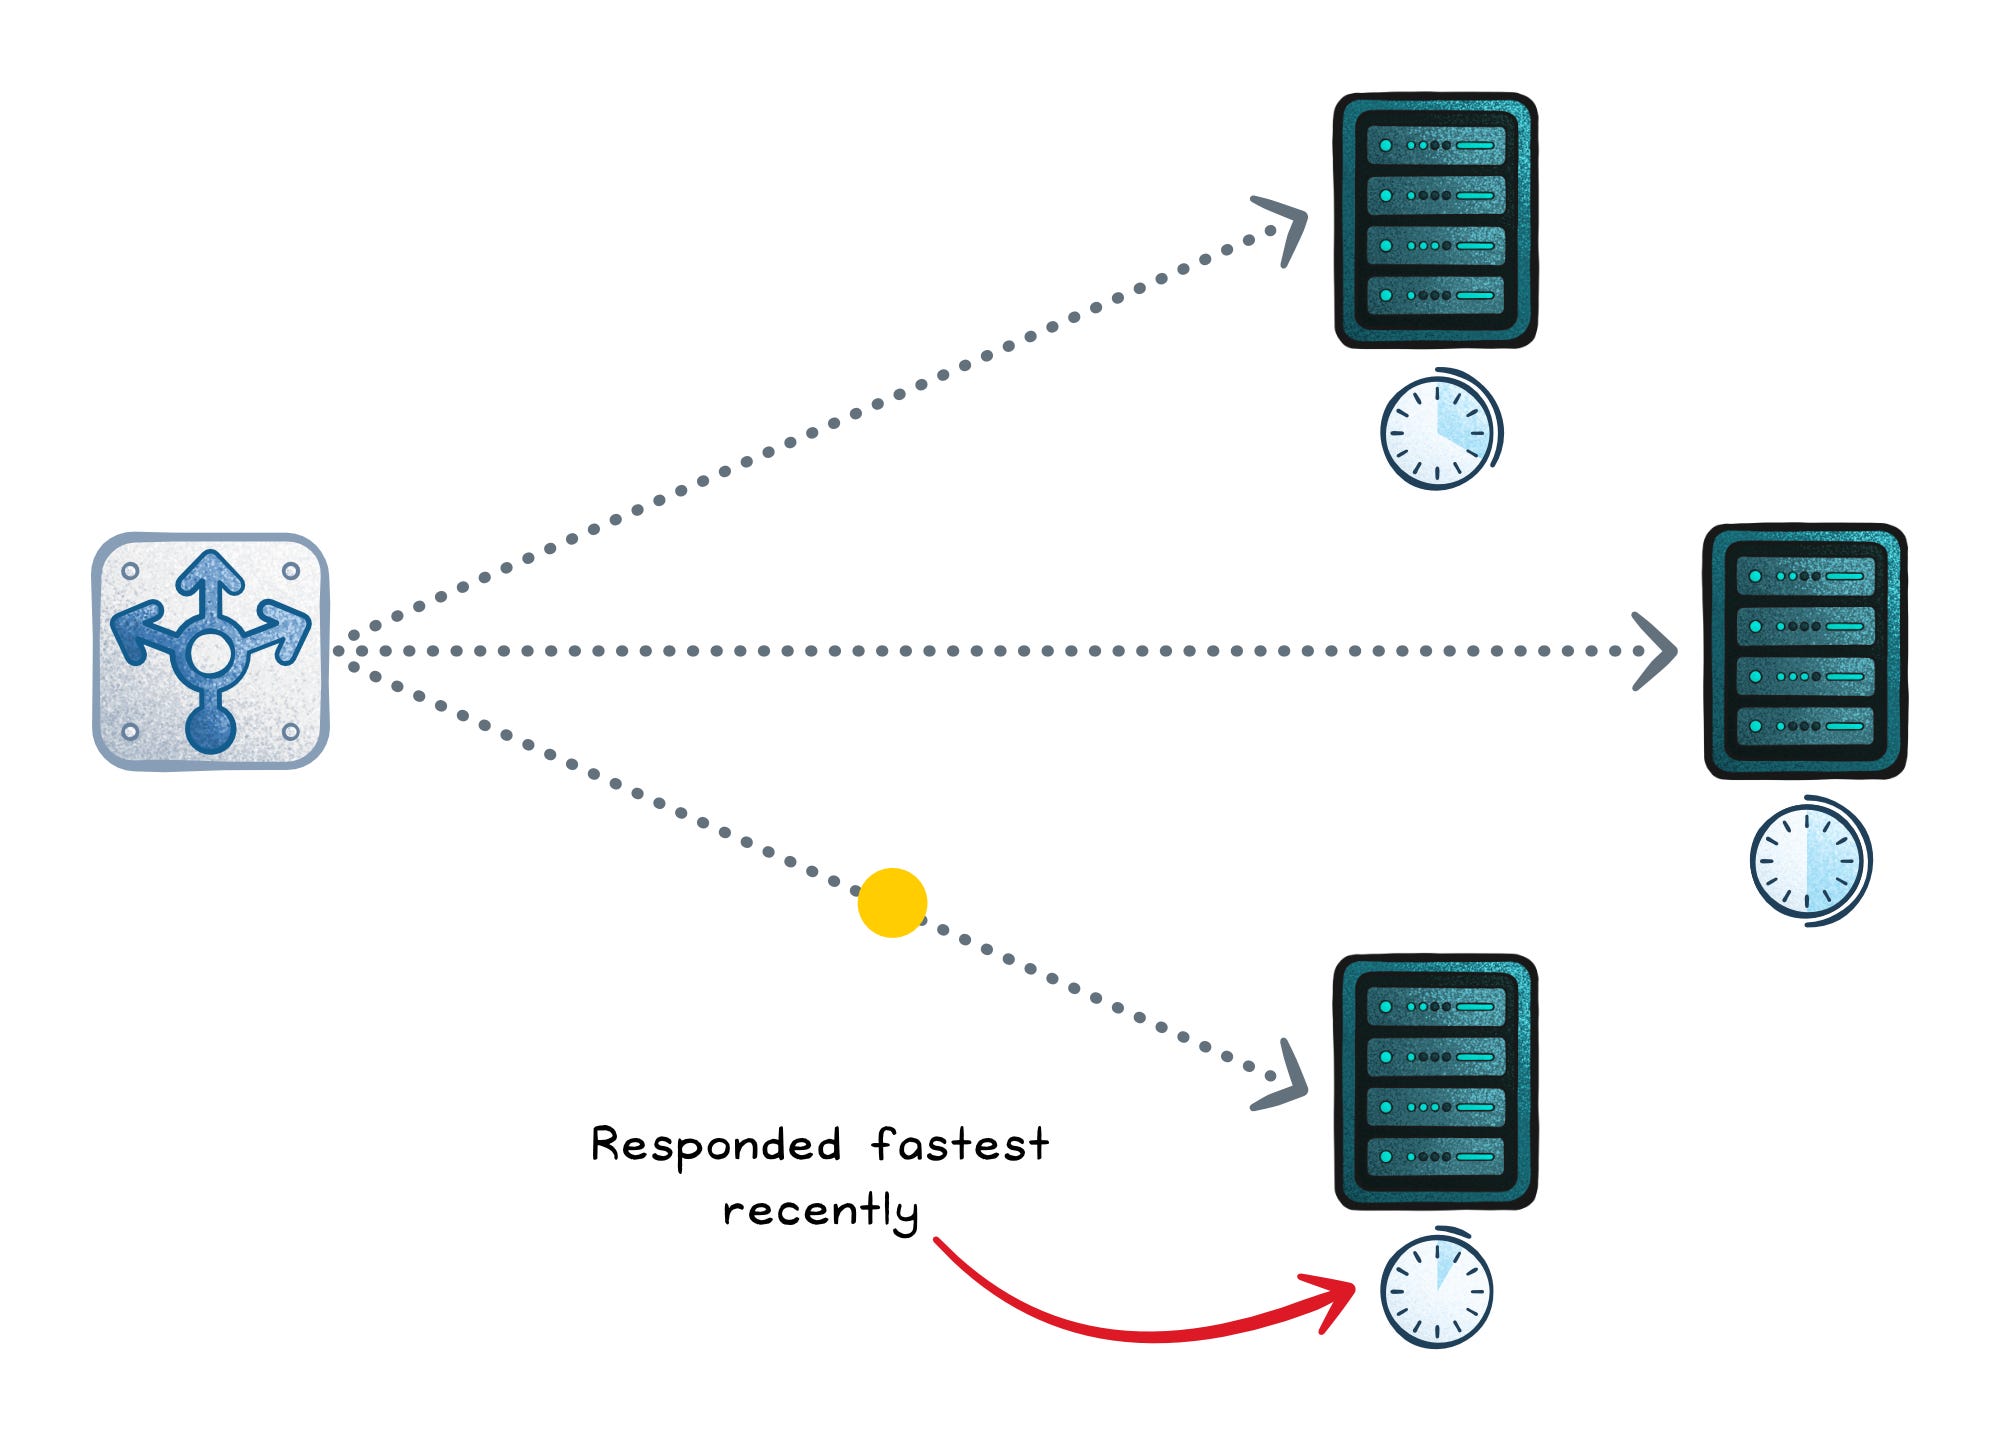
Least response time (dynamic)
Least response time favors the backend that has responded fastest recently (often using rolling averages). This can improve user latency and avoid slow-but-“low connections” hosts. It can also oscillate: traffic floods the “fast” host, it slows, traffic shifts, and you get waves.
Optimizes for → Lower observed latency
Works when → Measurements are stable and you smooth adjustments
Fails when → Noise causes traffic to swing between servers
Failure signs → Oscillation: the “fast” host becomes slow after being flooded
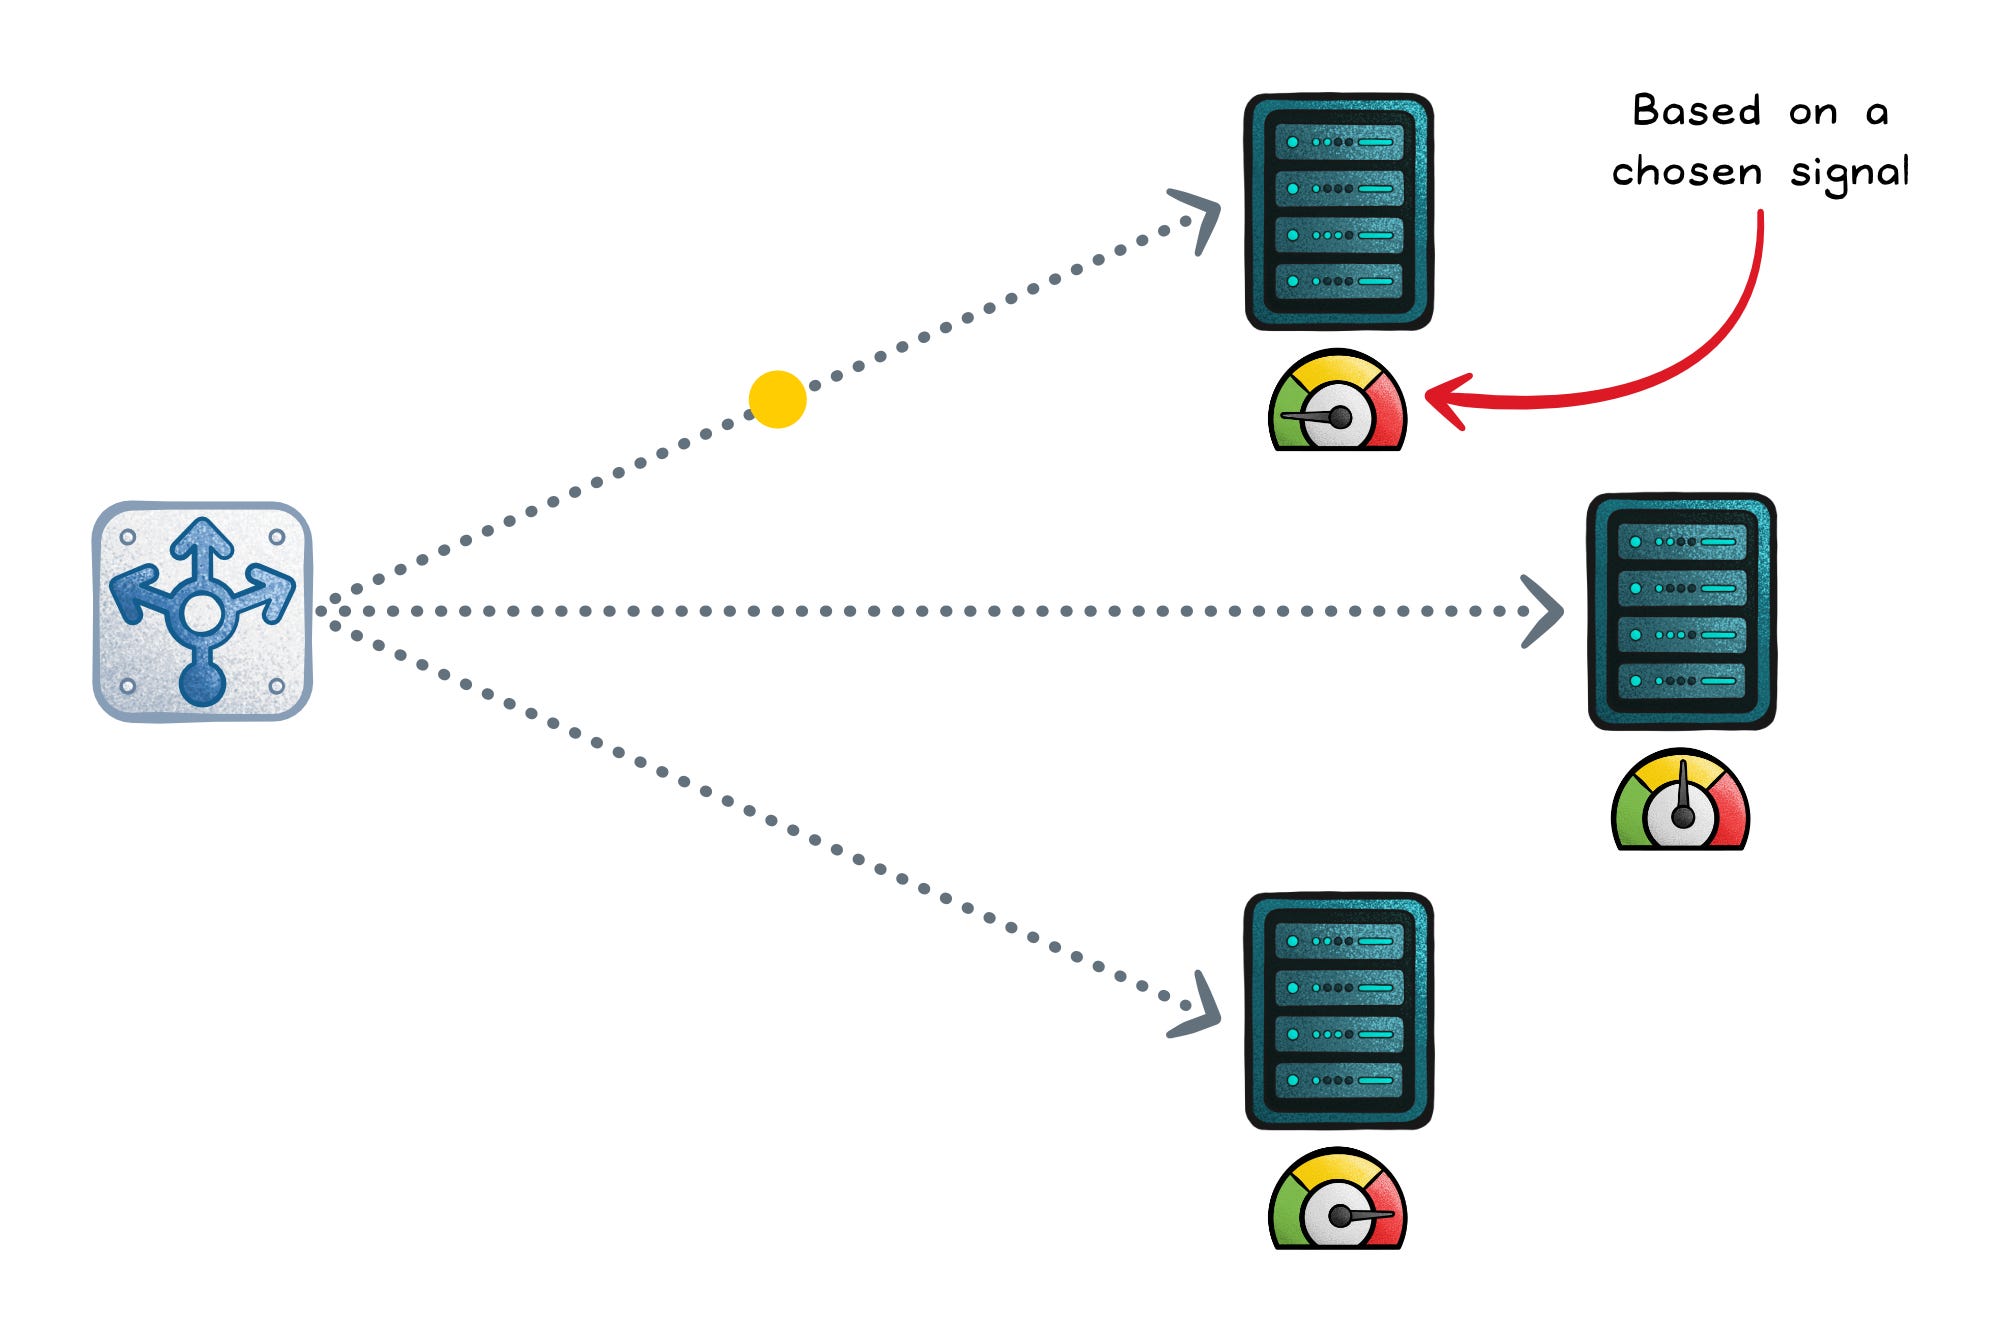
Resource-based balancing (dynamic)
Resource-based routing uses CPU/memory/bandwidth signals (usually from agents) to send traffic to the host with the most headroom. It can handle cases where connection counts lie (background jobs, noisy neighbors). It’s also the most operationally complex: agents, freshness, scoring, and stability are your responsibility.
Optimizes for: Keeping instances out of saturation by routing to where there’s real headroom
Works when: Your signals are accurate and comparable, update fast enough, and you smooth changes
Fails when: Metrics are laggy/noisy, you’re measuring the wrong bottleneck
Failure signs: Traffic “flaps” between hosts, sawtooth utilization, hot spots despite balancing, rising tail latency, and bursts of errors during metric spikes.
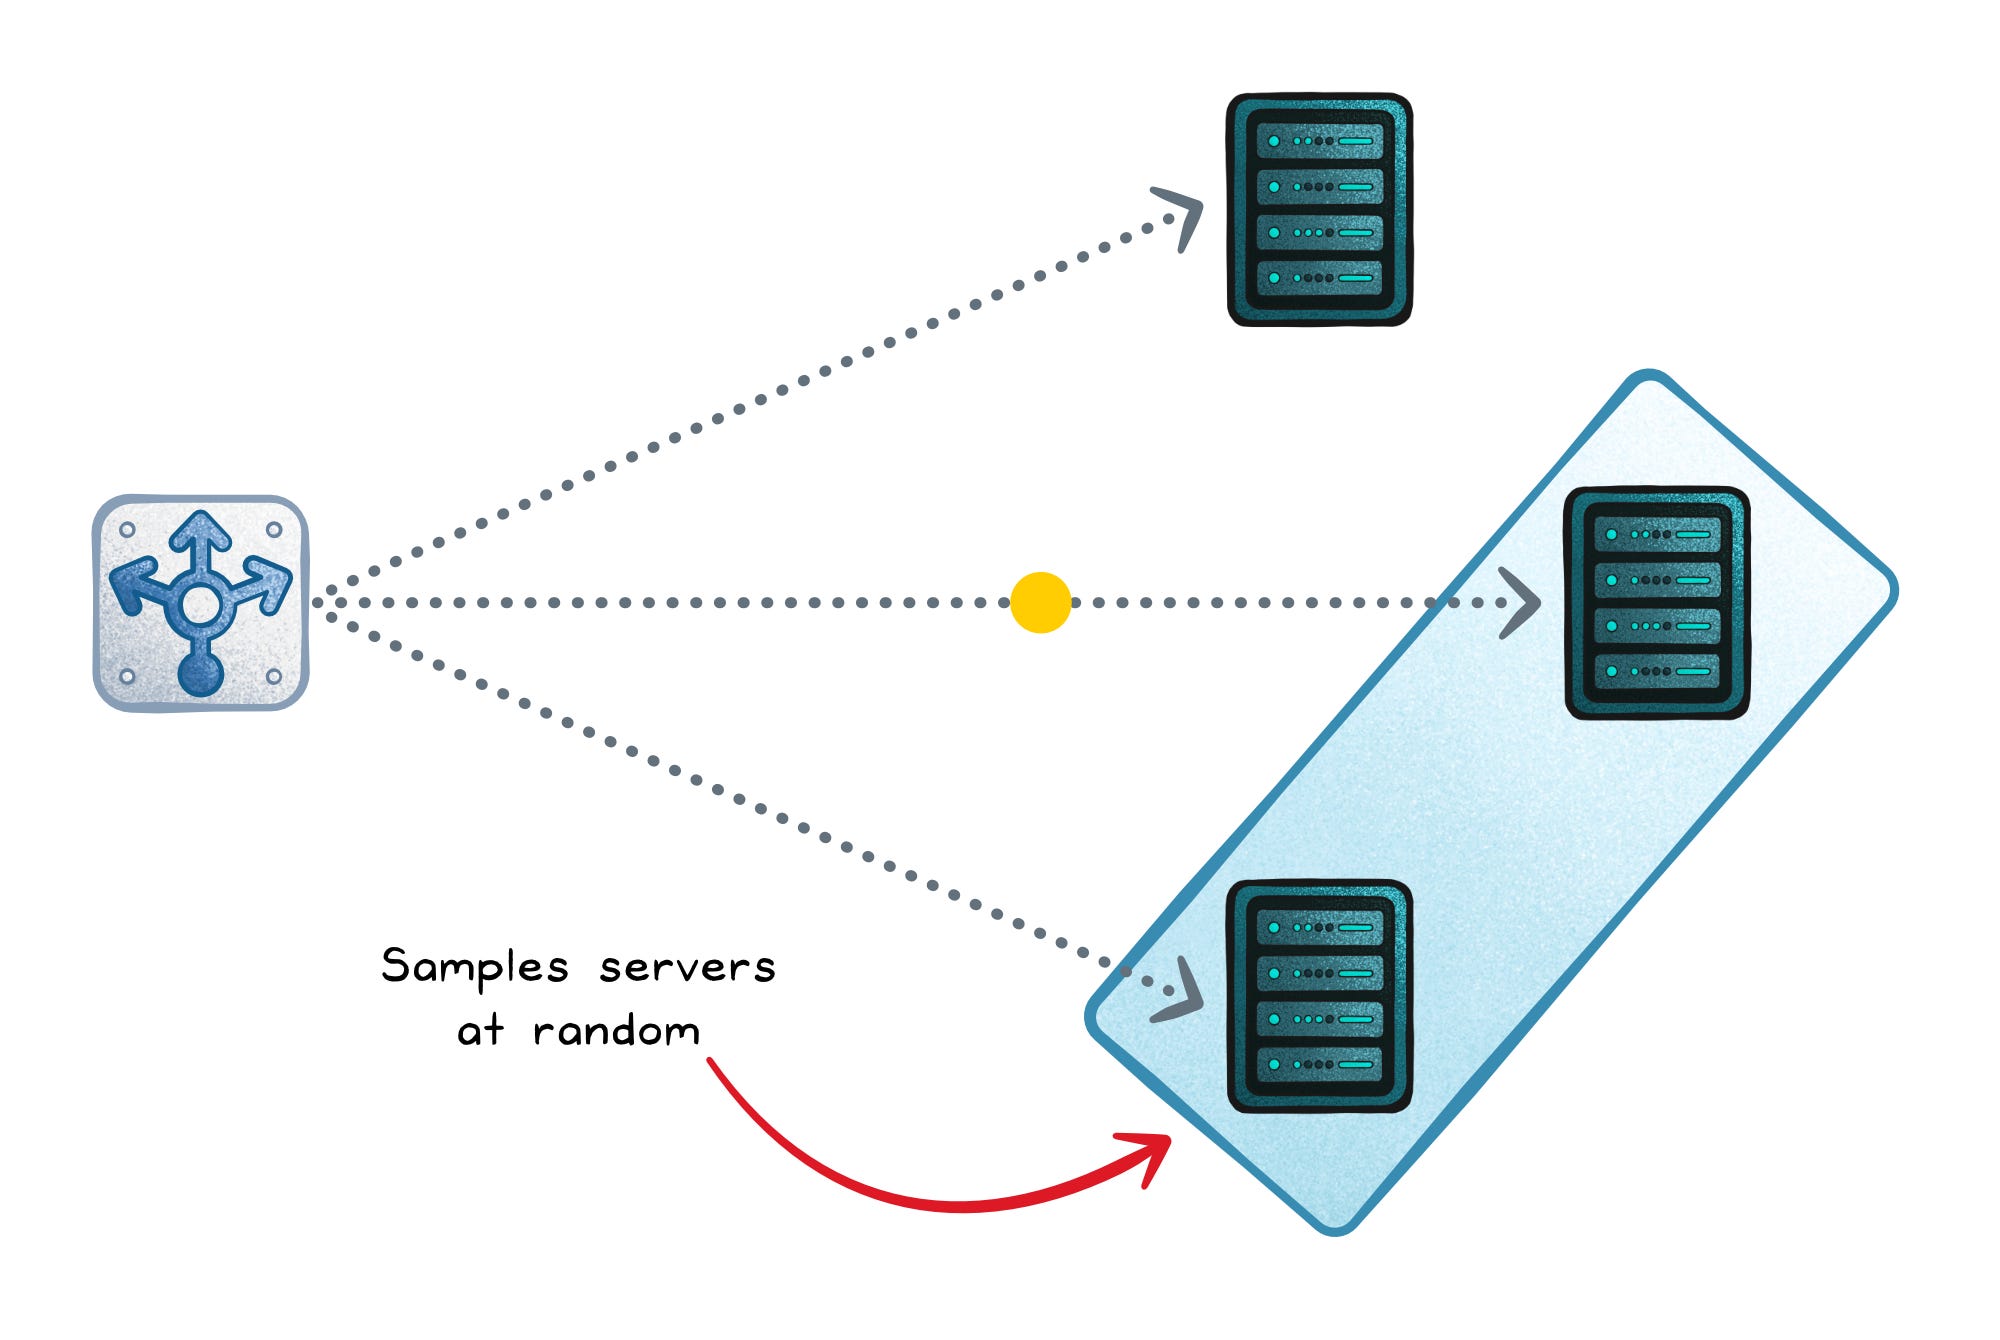
Power-of-Two Choices
In big systems you don’t have one load balancer.
You have many: ingress pods, proxies, threads.
That’s why “always pick the global least-loaded host” can backfire: everyone sees the same winner and stampedes it.
Power of Two Choices (P2C) fixes this by sampling two servers at random and choosing the better one (often fewer in-flight requests). You get most of least-connections’ benefit with way less coordination, and less herd behavior because each balancer sees different pairs.
Random sampling → Low overhead, no full pool scan
Local comparison → Still favors less-loaded servers
Distributed stability → Fewer “everyone picks the same winner” moments
Fails when → Load isn’t reflected by the metric you compare (e.g., CPU/queue/DB is the bottleneck), or the pool is so small that random picks don’t give you real choice.
Failure signs → Uneven hot spots, tail latency spikes, and “random” oscillation where different instances take turns getting slammed.
Session Affinity
Some services need session affinity (also called stickiness): repeated requests from the same “user” must land on the same backend because state lives in memory or local cache.
Source IP hash (affinity)
Source IP hash picks a backend by hashing the client’s IP. It’s simple and stateless, and it works even when you can’t use cookies. But it can create severe skew if many users share an IP (corporate NAT, mobile carriers) or if one client generates far more traffic than others.
Optimizes for → Session affinity without extra state
Works when → Client IPs are diverse and roughly represent users
Fails when → Many users share IPs (NAT, carrier networks, proxies)
Failure signs → One backend becomes a hot spot
Consistent hashing (affinity with stable scaling)
Simple IP-hash can reshuffle lots of clients when servers come and go. Consistent hashing cuts that churn: keys live in a stable hash space, so only a small slice moves when the pool changes (e.g. ring hash/virtual nodes, Maglev tables).
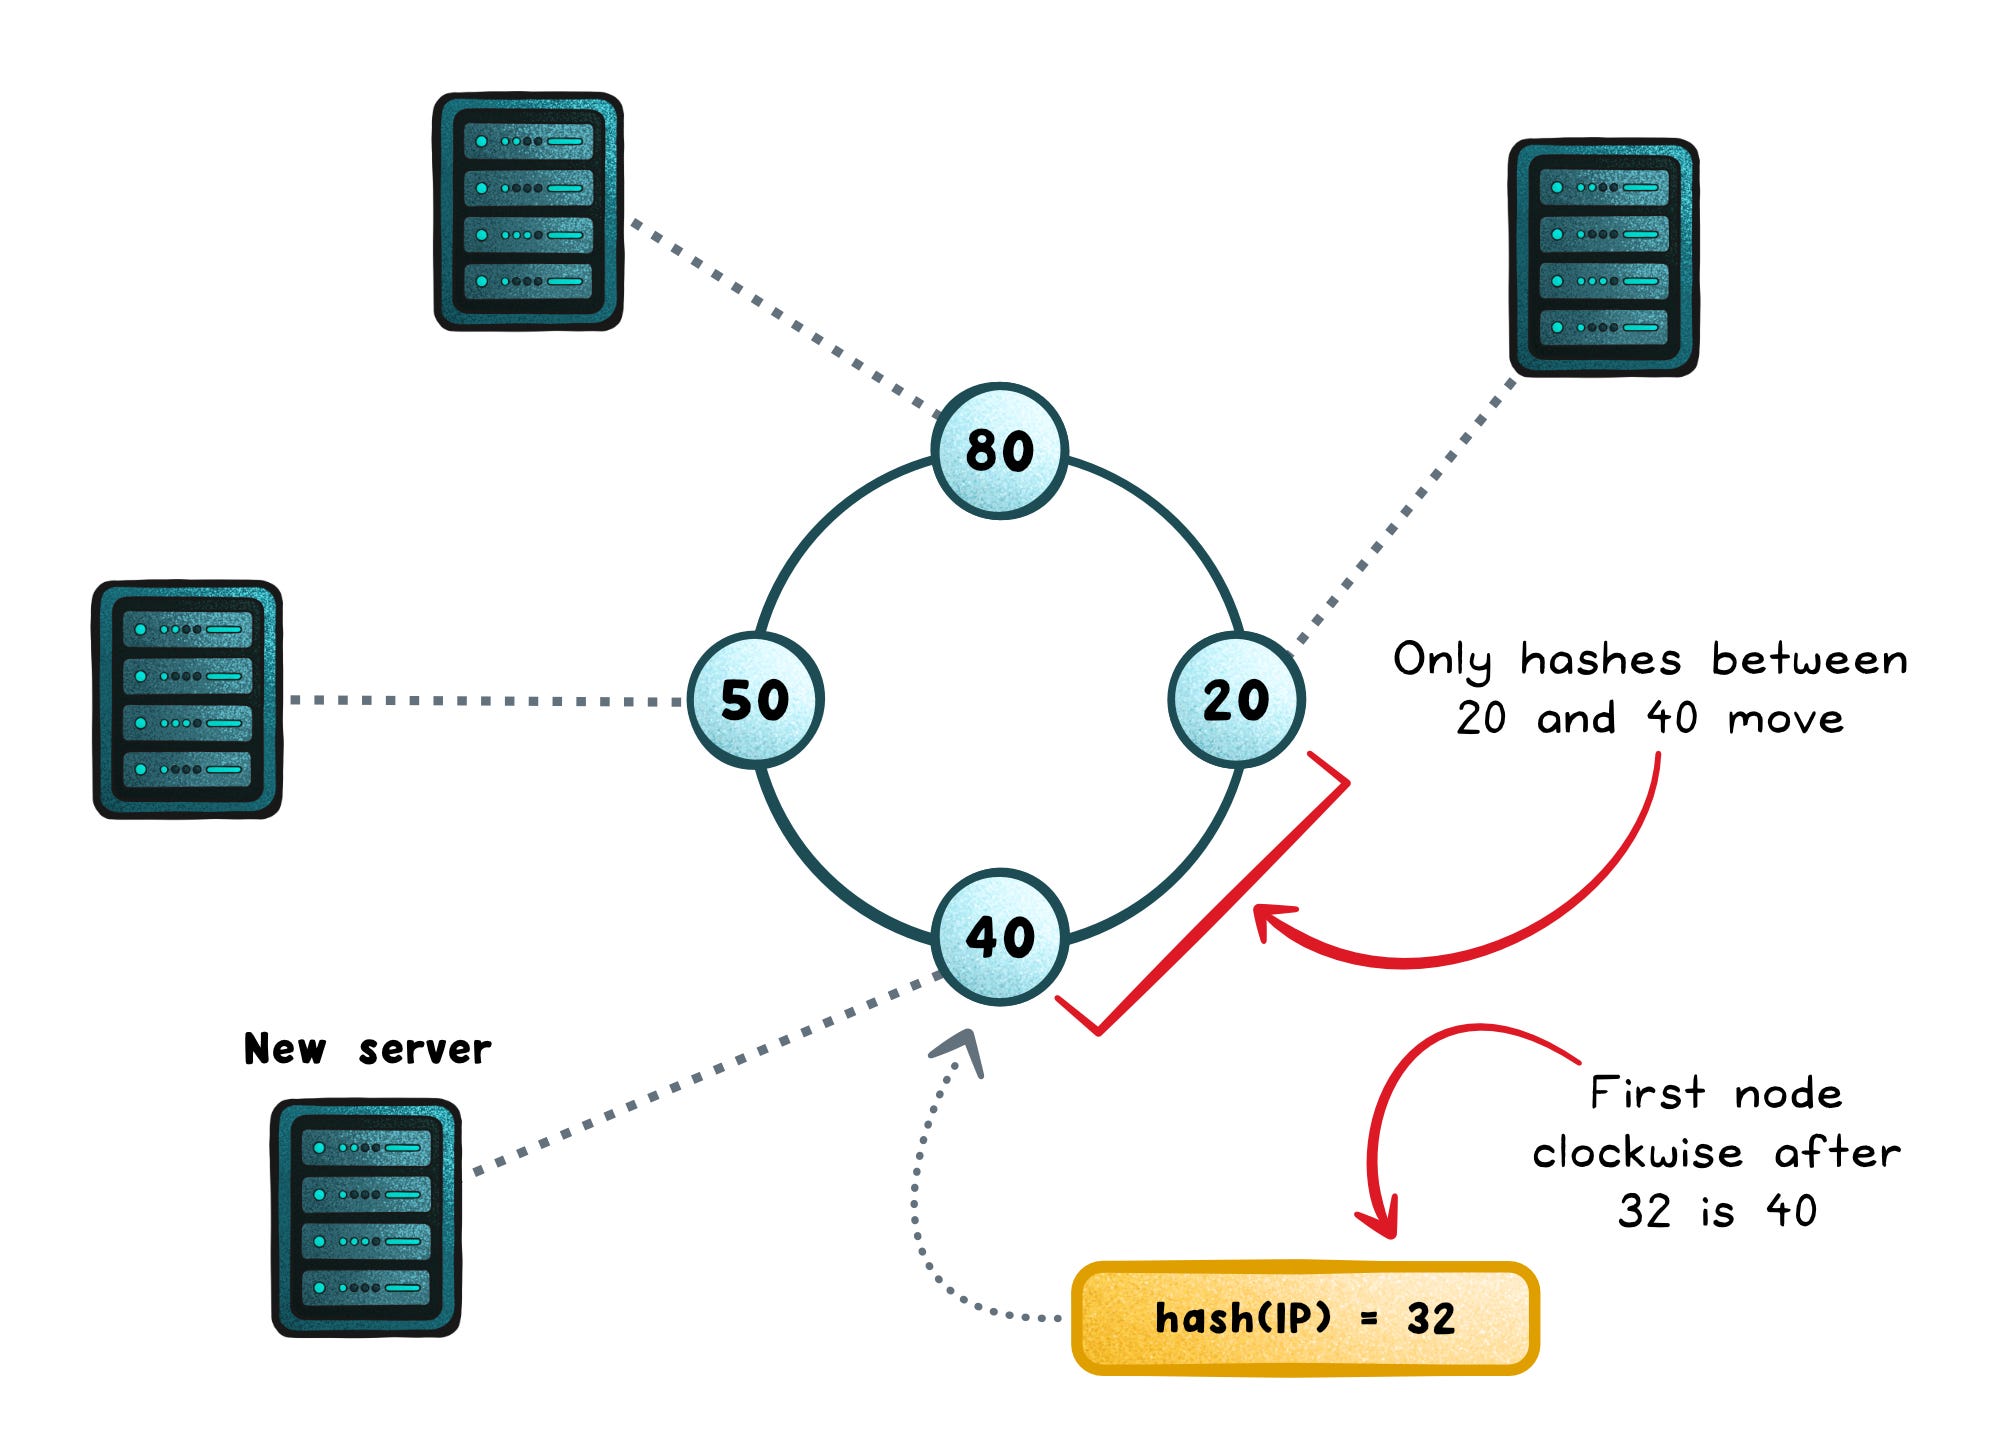
It’s great for caches and sharded state because locality survives scaling.
The catch: it won’t automatically relieve a hot server; hot keys keep landing on the same host unless you step in.
Optimizes for → Stable mapping as servers come and go
Works when → You want cache locality or sharded state with low churn
Fails when → A few keys dominate traffic
Failure signs → One shard stays under pressure because one key stays hot forever
How to Recognize When Your System is Fighting the Balancer
Most balancing problems show up as repeating symptoms. Treat them like fingerprints.
One instance is always hotter → The algorithm equalizes counts, not work
Latency spikes come in waves → The routing reacts too quickly to “fastest” signals
A subset of users is consistently slow → Stickiness pins them to a weaker backend
Canary looks right in aggregate but bad in practice → Weights or affinity skew who lands where
Cache hit rate drops after scaling → Key-to-server mapping churns more than expected
Incidents worsen after retries kick in → Retries amplify imbalance because they create extra traffic
These symptoms don’t prove the algorithm is wrong. They prove its assumptions need checking.
How to Pick an Algorithm for Your Context
Most teams don’t “implement” load balancing; they pick a config, accept a default, or choose a platform.
The trick is matching the algorithm to what your workload actually does:
Need affinity? → Use consistent hashing or sticky routing. Keeping state local cuts cache misses and avoids constant warm-ups.
Requests vary in duration? → Use least-connections or P2C. Concurrency tracks contention better than raw request counts.
Mixed instance sizes? → Add weights or use weighted least-connections. Heterogeneous fleets need proportional distribution.
Many balancers in play? → Prefer P2C-style strategies. They reduce herd behavior without global coordination.
Chasing user-perceived latency? → Use latency-aware routing carefully. It can cut tail latency, but it can also oscillate if you react too fast.
Wrapping Up
Load balancing is choosing where work piles up.
“Even traffic” is only safe when requests and servers are boringly uniform (they aren’t).
The right algorithm is the one whose signal matches your bottleneck, and whose failure mode you can live with.
👋 If you liked this post → Like + Restack + Share to help others learn system design.
Subscribe to get high-signal, visual, and simple-to-understand system design articles straight to your inbox:
This is excellent! I especially like how you frame load balancing as “spreading work safely” not traffic evenly.
The way you tie each algorithm to its hidden assumption (and concrete failure signatures) makes this feel very production-real and not textbook theory. Super useful.