
OAuth Clearly Explained
(4 min read) | OAuth flow, three different tokens, three different jobs, what OAuth actually solves, where OAuth systems usually break, and more


AI Code, Architectures, and Patterns in One Repo
Presented by Oracle
Oracle AI Developer Hub is a curated collection of real-world examples, architectures, and guides for building AI-powered applications. From RAG pipelines to agent-based systems, it brings together practical patterns, code samples, and best practices to help individuals and teams build production-grade AI solutions. If you find it useful, give it a star.
How OAuth Actually Works
OAuth is not login. It is permission.
That confusion causes a surprising number of design mistakes.
Teams pass around access tokens as if they prove identity, store them in risky places, or keep old flows alive because they “still work.” The result is a system that looks modern on paper but leaks security in the seams.
At its core, OAuth lets one application get limited access to another service without handing over the user’s password. Used well, it narrows access. Used poorly, it creates a false sense of security.
What OAuth actually solves
OAuth exists because “just give the app your password” is a bad system boundary. The moment a third-party app sees user credentials, you lose separation between identity, consent, and API access.
Every OAuth transaction involves four roles:
Resource owner → The user who owns the data and decides what to share.
Client → The application requesting access (a web app, mobile app, or background service).
Authorization server → Issues tokens after verifying the user’s identity and consent.
Resource server → The API that holds the protected data and validates tokens on every request.
The separation between the authorization server (which authenticates) and the resource server (which serves data) is intentional.
It lets companies run a single sign-on service across dozens of APIs without coupling their identity infrastructure to every service.
A typical flow looks like this:
The client redirects the user to the authorization server
The user authenticates and consents
The server sends an authorization code back to the client
The client exchanges that code for an access token over a secure back-channel.
That access token is then sent with every API request.
The user’s credentials never leave the authorization server.

Three tokens, three different jobs
OAuth’s token model trips up a lot of developers because the three token types look similar but serve completely different purposes.
Access token → Short-lived credential sent with every API call. The resource server validates it on each request.
Refresh token → Long-lived credential used only at the token endpoint to get a new access token without re-prompting the user. Never send this to an API. If it leaks, an attacker can silently maintain access long after the original session should have expired.
ID token → A signed JWT that carries authentication claims; who the user is, when they authenticated, which identity provider issued it.
That last one is a common gotcha.
An ID token is not an OAuth token.
It belongs to OpenID Connect (OIDC), which adds an identity layer on top of OAuth. So if your real goal is “log the user in and know who they are,” OAuth is not the answer. OIDC is.
Treating an access token as a login token (i.e. as proof of user identity) is one of the most common implementation mistakes.
Where OAuth systems usually break
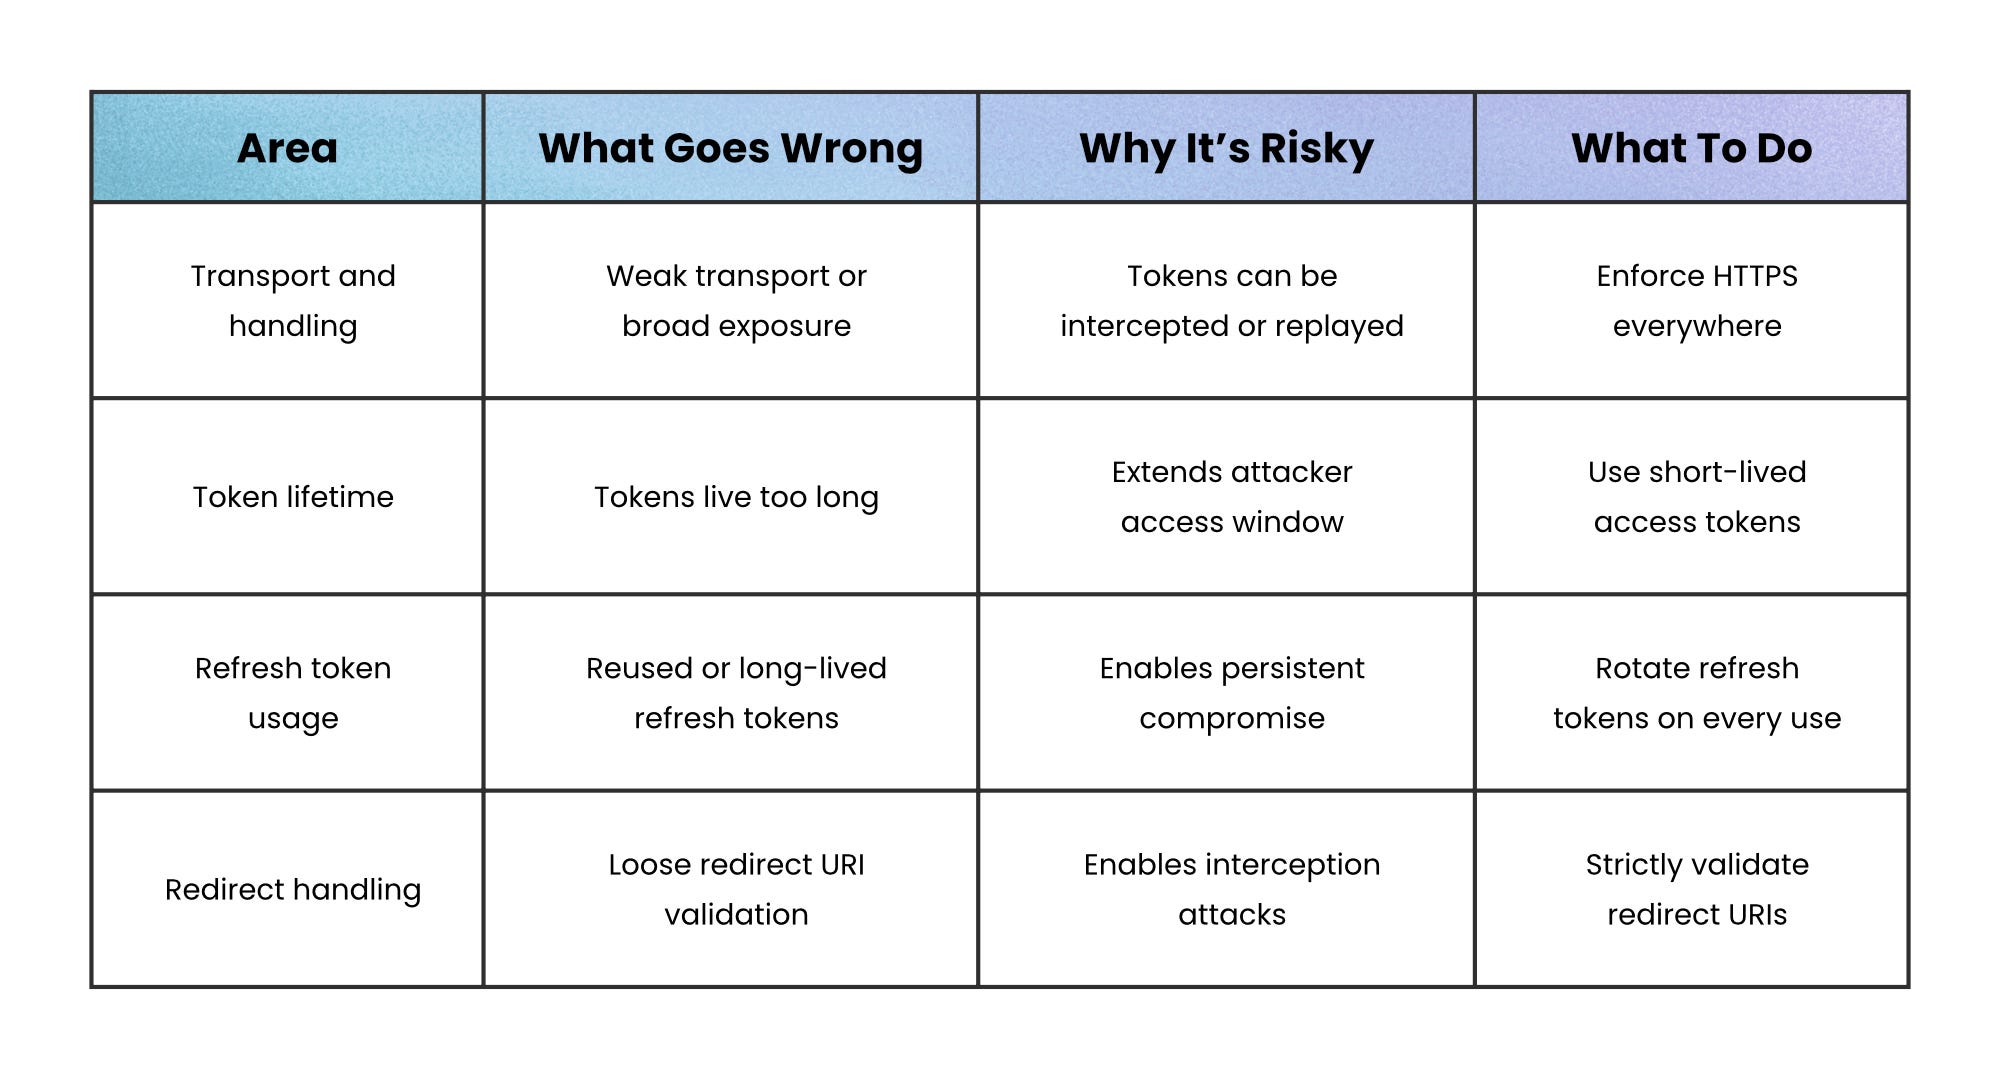
Under the hood, OAuth uses bearer tokens. Bearer tokens are especially sensitive because whoever possesses them can use them.
There’s no built-in proof of identity or cryptographic binding; the API simply trusts whoever presents the token. As a result, token leakage is effectively credential theft.
Leaks can occur through logs, query strings, browser storage, referrer headers, or weak transport. That’s why modern guidance focuses on limiting both exposure and impact: use HTTPS everywhere, keep access tokens short-lived, store them carefully, rotate refresh tokens on every use, and strictly validate redirect URIs.
For higher-risk environments, you can go further with sender-constrained tokens, which bind a token to a specific client instead of treating it as transferable:
mTLS → ties the token to the client’s TLS certificate
DPoP → binds the token to a client-controlled key pair
These add complexity, but they close the gap that bearer tokens leave open.
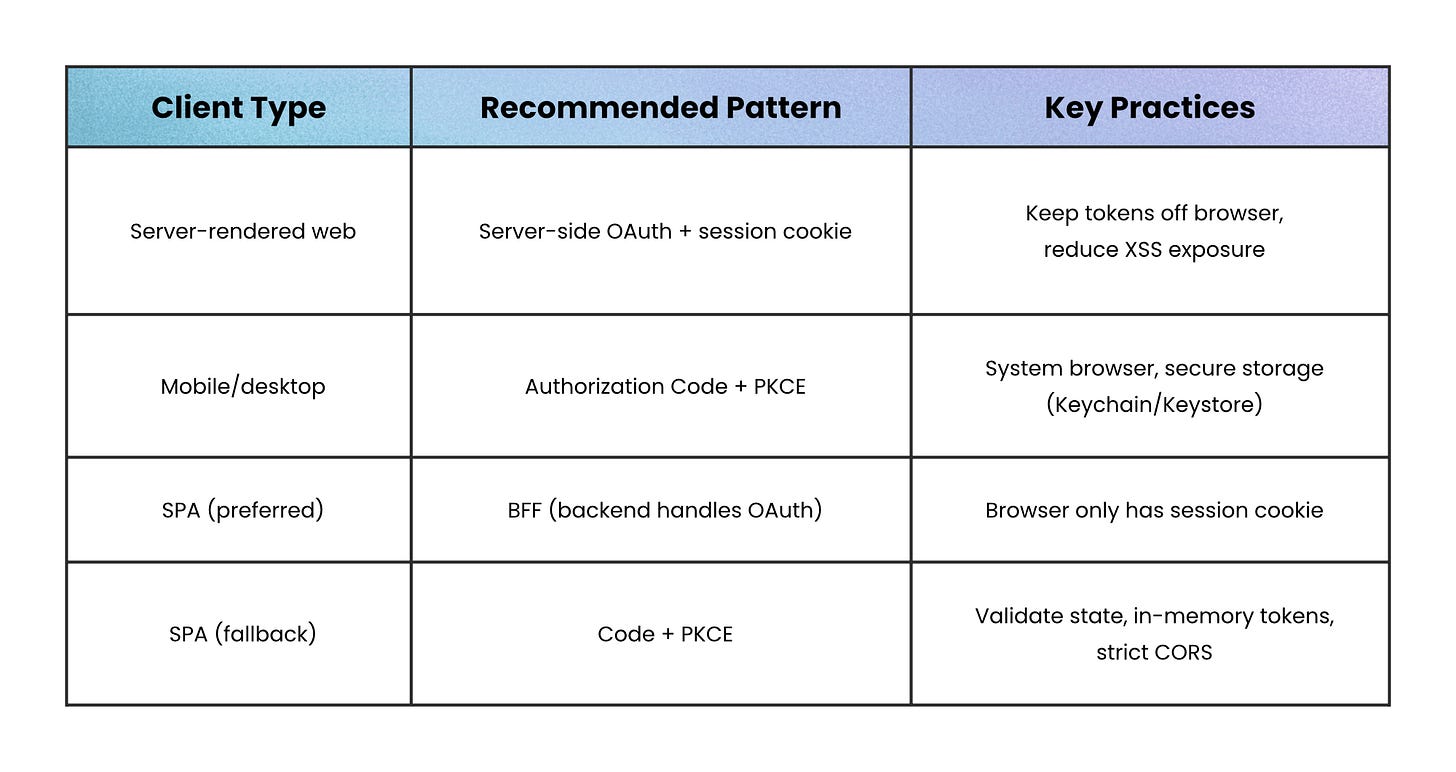
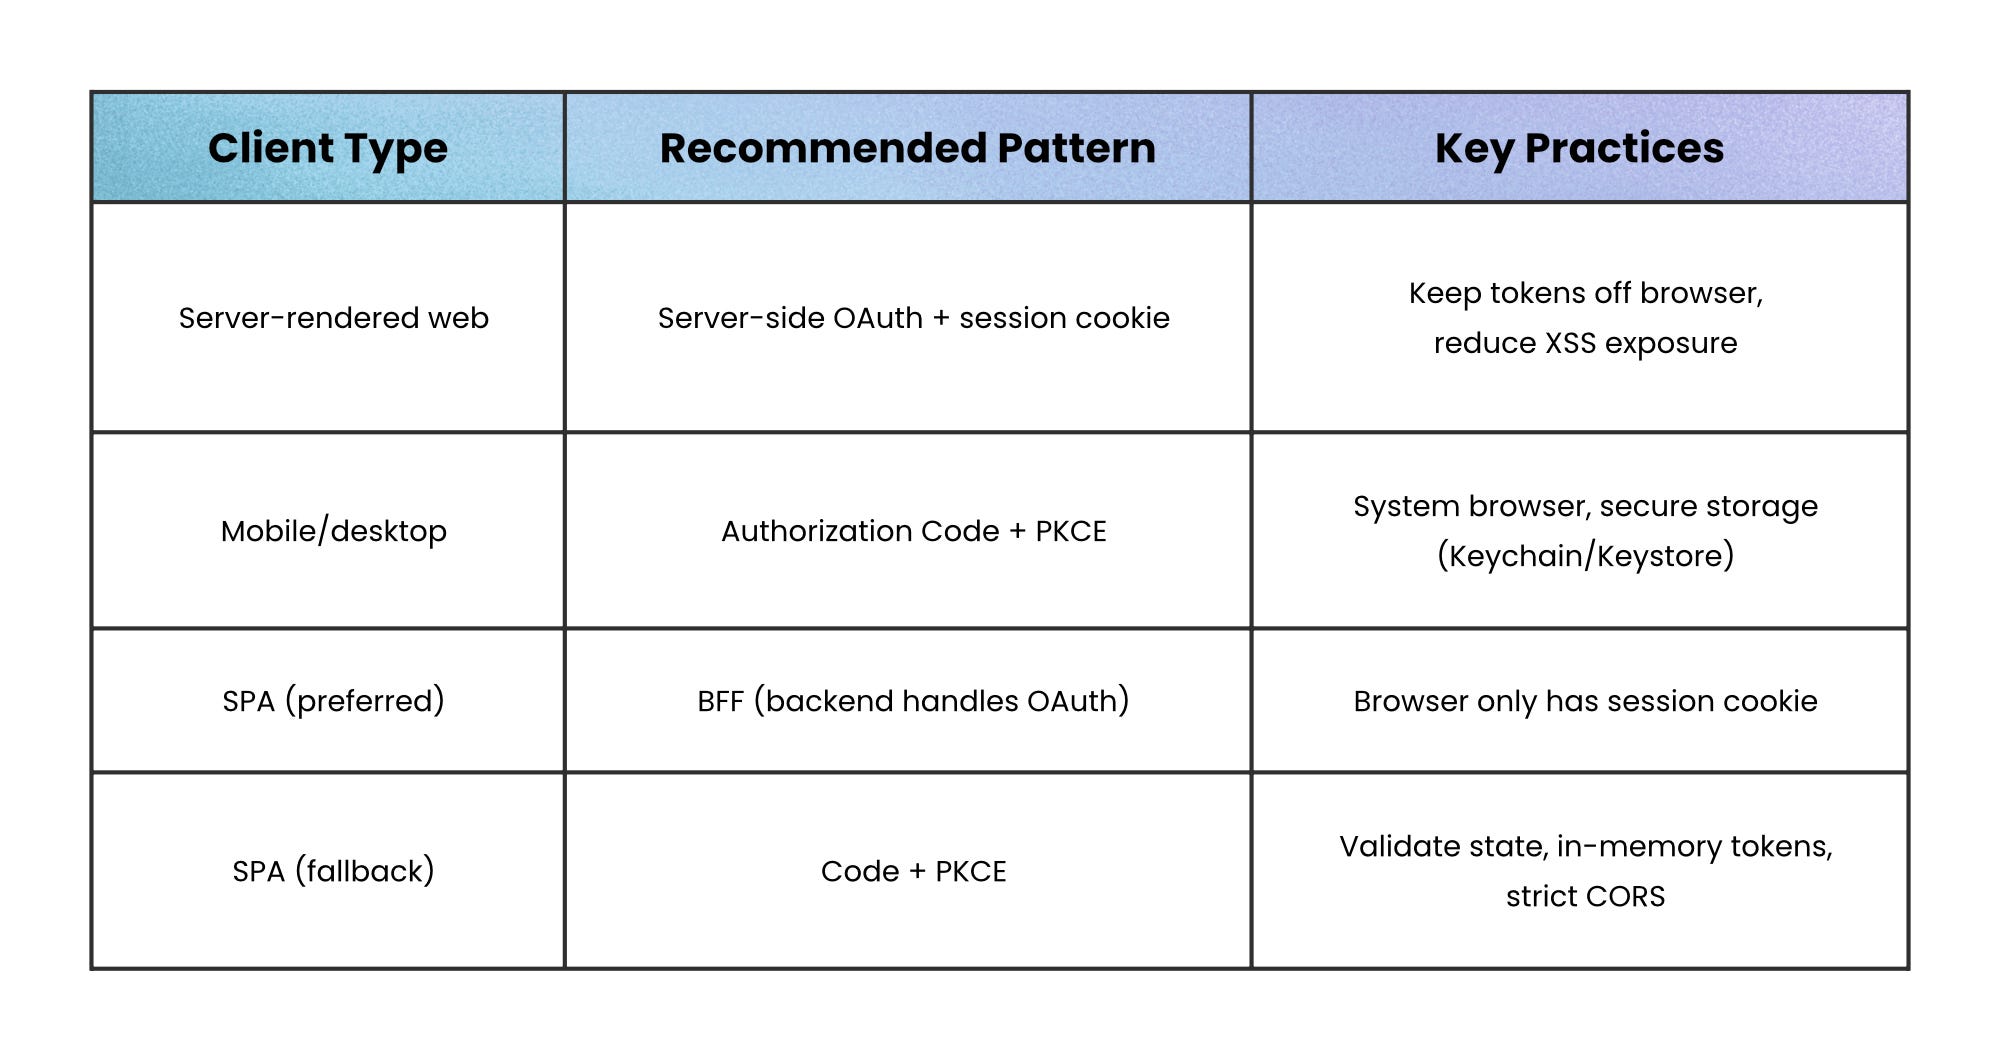
What to do for web, mobile, and SPAs
For traditional server-rendered web apps, keep it simple: handle the OAuth flow on the server, store tokens there, and give the browser a hardened session cookie instead.
That way, the browser never directly touches OAuth tokens, which significantly reduces exposure to XSS attacks.
For mobile and desktop apps, assume they’re public clients:
Use Authorization Code + PKCE (a flow where the app gets a one-time code after login and proves it initiated the request)
Open the system browser (not an embedded web view)
Store refresh tokens in secure platform storage like Keychain or Keystore.
For single-page apps, a Backend-for-Frontend (BFF) is often the safest route. The browser talks to your backend, the backend handles OAuth, and the browser just holds a session cookie.
If a BFF isn’t practical:
Fall back to Authorization Code + PKCE (get a one-time code after login and prove the request came from your app)
Validate the state parameter (to prevent CSRF attacks)
Keep tokens in memory rather than persistent storage like localStorage
Lock down CORS as tightly as possible
Wrapping up
OAuth gives applications permission to act, not identity to impersonate.
Every design decision in the framework (scoped tokens, short lifetimes, separate authorization and resource servers) exists to keep that boundary clean.
When something goes wrong with an OAuth implementation, it almost always traces back to that boundary getting blurred: a token meant for one API accepted by another, an access token used to prove identity, a scope granted that was never actually needed.
Keep the boundary clear, and the rest of OAuth becomes straightforward.
👋 If you liked this post → Like + Restack + Share to help others learn system design.
Wow!,it's really indetailed and part by part explained. Thanks.